Showing posts with label oci. Show all posts

Sunday, January 18, 2026

DNS Failover on OCI Using DNS Steering Policies

I recently put together a very small demo to showcase DNS-based failover on OCI using DNS Steering Policies. The idea was to build a setup, just enough to show how DNS failover behaves when server actually goes down.

The goal of the demo was straightforward: I wanted DNS to resolve to a primary instance as long as it was healthy, and automatically switch to a secondary instance once the primary stopped responding. No load balancers, no application logic, no frameworks — just DNS, health checks, and very basic HTTP endpoints.

This post briefly explains the steps. All implementation details and scripts are in my GitHub repository .

Demo setup
I used two OCI Compute instances running Ubuntu. On each instance, I started a minimal HTTP service on port 80. Each instance serves a simple HTML page that prints the OCI region, the instance display name and the public IP address. This makes it easy which instance DNS is pointing to at any given time.

The page is generated dynamically using instance metadata, and the HTTP service is started with Python’s built-in web server. The exact script I used is included in my Github repository.

DNS and health checks on OCI
On the OCI side, I assumed a public DNS zone already existed.

I then created an HTTP health check that monitors port 80 on both instances.
Using that health check, I created a DNS steering policy with the FAILOVER template. The primary instance was given the highest priority, and the secondary instance a much lower one. I also kept the TTL low (30 seconds) so that failover could be observed quickly.
And finally attached the steering policy to domain.

Testing failover
To test the behavior, I queried DNS and accessed the service from a third host using standard tools like dig, nslookup, and curl.

As expected, DNS initially resolved to the primary instance. When I stopped the HTTP service on the primary, the health check failed, and DNS started returning the secondary instance instead.

Because this is DNS-based failover, the switch is not instant. TTL still applies, which is an important point to understand when using this mechanism in real environments. According to my tests failover and failback takeas around 88 seconds.

Cleanup
One thing I ran into while testing was that DNS steering policy attachments are easy to create, but not as obvious to remove from the Console. Besides console experience is not the best.

To avoid leaving resources behind, I added CLI scripts to my Github repository to create, list and delete steering policy attachments, steering policies and HTTP health checks. This makes it easy to run the demo multiple times without cluttering the compartment.

Closing thoughts
This demo is intentionally basic, a clean way to observe how failover happens. While DNS-based failover is simple and effective.

If you want to try it yourself, all scripts and commands are documented in my GitHub repository .

While DNS-based failover is simple and effective, it’s not the right solution for every scenario. Session and data consistency issues must be evaluated at application level. Also DNS caching, resolvers ignoring low TTLs, and client-side behavior all introduce uncertainty that you can’t fully control. If an application needs lower failover times, a global load balancer or application-level failover mechanisms are usually a better fit. However it's still a viable approach to improve your RTO and disaster recovery capabilites during a regional outage.

Friday, January 16, 2026

IIS, NFS, and the Drive Letter Trap: Using OCI File Storage on Windows for High Availability (HA)

Recently, I came across an interesting problem while working on a customer deployment on Oracle Cloud Infrastructure (OCI).
This post is a technical field note for myself and people who might find themselves in a similar situation.Definetly not a reference architecture or a best-practice guide. It documents:

  • A real life issue encountered when running IIS on Windows with OCI File Storage Service (FSS)
  • The thought process behind the initial design
  • What failed, and why it failed
  • The minimal change required to make it work
I thought it was just a practical issue that can easily show up when moving Windows workloads from on-premises to OCI, and decided to write about it.

1 The use case
Customer has an ASP.NET application running on IIS, previously deployed on-premises. And they are in the process of moving the application to Oracle Cloud Infrastructure, with the following design:

  • Two IIS nodes (Windows Server 2022 Standard)
  • High availability deployment
  • All application servers in a private subnet
  • A public load balancer in front
So far, this is a fairly standard 2/3-tier web deployment.

The complication
The application stores some data on disk, and that data is meaningful only when combined with database records (for example: uploads, generated files, artifacts, etc.).

Once you go multi-node, the obvious question appears: How do both web servers see the same files? A shared storage layer is required.

2 First approach: shared storage with OCI FSS
The natural choice here was OCI File Storage Service (FSS):

  • Managed NFS service
  • Simple to mount on multiple instances
  • Works well for shared file access across compute nodes
  • Many features for resillience (backup/restore, snapshot, cross-region replication, etc.)
The plan was straightforward:
  • Create an FSS export and mount target in private subnet
  • Mount File Systems on both Windows IIS instances
  • Point the application to a shared directory

Where things start to break
The FSS export was mounted successfully on both Windows servers:
  • The NFS client was installed
  • The mount was visible at the OS level
  • Files could be created manually from command line and explorer, and it was visible on the other node.

However, the application had a fixed directory structure and expected a specific path under wwwroot. So when I decided to add a Virtual Directory another surprise appeared: IIS doesn’t even “see” the NFS-mounted drive. How could the application use it?

The symbolic link idea
The first workaround that came to mind was simple: Create a symbolic link under C:\inetpub\wwwroot that points to the NFS mount.

This approach often works with local disks and SMB shares, so it looked reasonable. However, once the application was tested, file operations failed with the following error: Error: Could not find a part of the path 'C:\inetpub\wwwroot\FSSApp\data\test.txt' At this point:
  • The path did exist
  • The symbolic link was valid
  • The same path worked from an interactive PowerShell session
  • The failure happened only when accessed from IIS
So the question became: What exactly is going on here?

3 What’s actually going on between IIS and NFS
Initially, this looked like an identity or authentication problem, but further testing showed that the real issue was more fundamental.

Drive letters and Windows services
On Windows, drive letters are session-scoped.

This means, a drive letter is associated with the user session that created it. It is visible to that user in Explorer and PowerShell. It is not automatically visible to Windows services. You will experience the same error when you launch command prompt as Administrator.

IIS worker processes run as services, execute in Session 0 and do not inherit drive mappings from interactive logons.

So when the NFS export was mounted using a drive letter (for example X:), the mount worked for the logged-in user. The symbolic link resolved correctly in PowerShell. However IIS could not resolve the same path. From IIS’ point of view, the target simply did not exist.

That’s why the application failed with "Could not find a part of the path" misleading but understandable. The path exists, but not in the IIS execution context.

Why the symbolic link didn’t work (at first)
The symbolic link itself was not the problem. From IIS’ point of view, the symbolic link resolves to "a drive letter that doesn't exist". Letter was assigned in an interactive user session.

Why UNC paths work
UNC paths are global, session-independent, resolvable by Windows services, accessible from IIS worker processes

When the symbolic link was recreated to point directly to the UNC path, application pool identity remained unchanged, pass-through authentication was still used and yet, file uploads worked immediately.

Root Cause
So the real root cause was not IIS vs NFS, and not strictly authentication. IIS cannot access drive-letter–based network mounts, because drive letters are session-scoped and assigned letter stayed in user session.

Where domains still matter
Active Directory and domain membership are not required for this specific fix. However, they become relevant when you need non-anonymous NFS access.

Even though IIS doesn't see session scoped mapped drive, the simplest and practical solution was using a symbolic link with UNC path and avoid drive letter. This way IIS directly can access to globally resolvable paths.

4 The Working Setup
We install:

  • IIS Web Server
  • ASP.NET (my test application uses Web Forms)
  • Required IIS dependencies

  • NFS Client (Services for NFS)

  • Mount FSS to X: drive (Command Prompt, not Power Shell)

  • IIS can't see FSS
  • Create symbolic link (Workaround)

  • Create a test application, web form to upload file to data folder which is mapped to FSS

  • Upload fails when symbolic link is created using session scoped Drive X:/
  • Upload is successfull when symbolic link is created using UNC path to FSS

Friday, January 2, 2026

Deploy QRadar Console (SIEM) on OCI using IBM Cloud Marketplace Image

In my previous blog post I explained how to deploy QRadar Console on OCI using an ISO file, along with the limitations of that approach—especially the 2 TiB boot volume limitation caused by legacy BIOS and IDE-based images.

While looking for a solution to the storage problem, I revisited the IBM QRadar 7.5 Installation Guide . In Section 19, IBM describes QRadar marketplace deployments on major cloud providers, including AWS, Azure, Google Cloud, and Oracle Cloud Infrastructure.

After going through that section, it became clear that IBM Marketplace images are the intended and supported approach for cloud deployments—and importantly, they solve the storage design problem.

This blog post walks through how I deployed QRadar on OCI using the IBM Marketplace image, and why this approach works significantly better.

Unlike ISO-based installations:

  • The Marketplace image is cloud-optimized
  • QRadar is installed as software, not a pre-built appliance
  • Storage layout supports large secondary disks
  • The installation flow is exactly as documented by IBM
  • No legacy BIOS / IDE limitations
Most importantly, /store is placed on a secondary block volume, not the boot disk. This completely avoids the 2 TiB boot volume limitation discussed in my previous post.

So here are the high-level steps:
  1. Download QRadar image from IBM Cloud Marketplace
  2. Upload the image to OCI Object Storage
  3. Create a custom image in OCI
  4. Provision the OCI instance with proper networking and storage
  5. SSH into the instance and install the QRadar Console

1 We downloaded the QRadar Console image from the IBM Cloud Marketplace , as referenced in the IBM QRadar 7.5 Installation Guide. The downloaded file name is ORACLE-CLOUD-741-console-20220811114721 which is similar to what is mentioned in the guide. This image is specifically prepared for Oracle Cloud and follows IBM’s supported deployment model.

2 Next, I uploaded the image to an OCI Object Storage bucket. You can use OCI web interface or create Pre-authenticated requests wih object writes following steps here .

3 Then using the OCI Console:

  • Navigate to Compute → Custom Images
  • Create a new custom image
  • Select Object Storage as the source
  • Choose the uploaded QRadar image file
  • Select OCI as the image type
As you see we don't worry about launch mode (Paravirtualized, Emulated etc.), OCI validates the image and prepares it for instance creation.

4 While creating the VM instance from the custom image, there are a few important considerations.

Networking

  • Although the guide says "Assign a public IPv4 address" during provisioning, I did not. I reserved a public IP for practical reasons, and assigned it after provisioning. This kind of workaround works fine.
  • HTTPS access on port 443 was enabled using a Network Security Group (NSG)
  • Another benefit of this approach is ability provide SSH access to the VM through ssh key authentication, not password.
Storage
  • Also guide doesn't mention anything about the boot volume and if left untouched VM is provisioned with 122GB boot volume. I find this very small for a QRadar deployment. So I allocated 2 TiB and added some post-provisioning steps to make this space available.
  • I created a secondary disk by attaching block volume, installation guide recommends using Paravirtualized attachment type, no need set device path, and obviuosly Read/write access type. I was able to use 12 TB without any problem.
Important Storage size cannot be increased after installation. Make sure you allocate enough space for log retention from day one.
Important I tested provisioning the instance with the default boot volume size (122 GB) and resizing it after deployment. I was able to successfully extend the boot volume up to 2 TiB without breaking the boot process or affecting QRadar functionality.

5 After the instance was running I connected using my SSH keys provided during provisioning. Note that user is cloud-user not opc.
ssh -i ~/.ssh/server.key cloud-user@$public_ip Fixing Storage on Boot Volume
So when checked the boot volume disk capacity is 2T but partition table doesn't know this, and needs to be updated. Here are the steps:

  • Expand the Partition: Use fdisk to extend sda3 to fill the 2 TB disk.
  • Resize the PV: Run pvresize so LVM recognizes the partition is now larger.
  • Extend the Logical Volumes: Decide which folders need more space (e.g., /var or /opt) and grow those specific LVMs.

Expand the Partition
Enter the fdisk interactive menu: fdisk /dev/sda Follow these keystrokes carefully:
  1. p: Print the table (one last check of that Start sector).
  2. d: Delete a partition.
  3. 3: Select partition 3. (Don't worry, the data is still on the bits of the disk).
  4. n: New partition.
  5. p: Primary.
  6. 3: Partition number 3.
  7. First sector: TYPE THE START SECTOR YOU WROTE DOWN. (It usually defaults to the right spot, but double-check).
  8. Last sector: Press Enter to accept the default (the end of the 2 TB disk).
  9. Signature?: If it asks "Do you want to remove the signature?", type N (No). This is critical.
  10. t: Change type.
  11. 3: Select partition 3.
  12. 8e: (or 31 for LVM on some versions). Type L to list codes if unsure, but usually, it's Linux LVM.
  13. w: Write changes and exit.
Since sda3 is currently mounted (it holds your OS!), the kernel might use the old table until a reboot. Force an update: partprobe /dev/sda (If partprobe gives an error that the disk is busy, you may need to reboot, but usually it works on modern RHEL).

Or simply just reboot!

Resize the PV
Now that the partition is 2 TB, tell LVM to use that new space: [root@qradar-20260102-1919 ~]# pvresize /dev/sda3
Physical volume "/dev/sda3" changed
1 physical volume(s) resized or updated / 0 physical volume(s) not resized
vgs (volume group scan) should display a large amount of "VFree" (Virtual Free space). [root@qradar-20260102-1919 ~]# vgs
VG #PV #LV #SN Attr VSize VFree
rhel 1 9 0 wz--n- 1.95t 1.83t

Extend the Logical Volumes
QRadar is extremely "log-heavy." If /var/log or /storetmp fills up, the services will crash or stop collecting events. So based on my current LVM layout and best of judgment this is what I've come up with:
Mount Old New Why?
/ (root) 20 GB 100 GB Gives the OS breathing room for updates and temporary files.
/opt 14 GB 200 GB QRadar binaries and many extensions/apps live here.
/var/log 18 GB 500 GB Critical. This is where QRadar stores active logs.
/storetmp 15 GB 500 GB Used for temporary data processing and backups.
/var 8 GB 50 GB General system variable data.
Free Space 0 GB ~500 GB Keep this unallocated. LVM allows you to grow any folder instantly later if it gets full.

And here are the commands to distribute space:


QRadar Software Installation
Then I started installation as documented in installation guide: sudo /root/setup_console At some point you might see a hardware warning message, proceed with Y.

Script will format attached secondary block volume (sdb), organize the storage with volume groups and folders. Also install required packages, install software ("All-In-One" Console and many supporting others) and configure everything. When the script completes, it will ask you to set the admin password. You can set/change the admin password anytime using: sudo /opt/qradar/support/changePasswd.sh -a

Backup/Restore and Disaster Recovery
I configured volume group backups within the same region and successfully tested restores.

For guaranteed restore times, I also usedcross-region volume group replication , which creates consistent snapshots of both the boot and block volumes in another region. After activating the volume group, I created a new instance, reconfigured networking, and confirmed full functionality.

This provides a good business continuity plan.

For lower RPOs (e.g., under 30 minutes), tools like RackWare can be evaluated for continuous replication.

Final Thoughts
If you are planning to run QRadar on OCI for production, this is the recommended and supported approach. The ISO-based method can still be useful for labs, short-term testing or if you can live with 2 TiB storage, but for long-term SIEM workloads, IBM Marketplace images are the right choice. Just plan your storage requirements ahead including log retention and software updates as well and allocate enough storage to both boot volume and additional block volume.

Saturday, May 3, 2025

Sending Email with APEX_MAIL and Mailx using OCI Email Delivery

This is a very common requirement, funny that I've never used it until today. So the requirement is to send emails from my APEX application using APEX_MAIL package. For cloud deployments (especially on Autonomus Database) recommended way is to use Email Delivery service. And of course most customers would like use their own domain as the sender. So here are the steps:

1 Create email domain following Developer Services >> Email Delivery >> Email Domains >> Create Email Domain

2 Add DomainKeys Identified Mail (DKIM)

Create DKIM selector in the <prefix>-<shortregioncode>-<yyyymm> format. You can find short region codes here .
Click Generate DKIM Record button, it will populate CNAME values, save these values to update your DNS records.
Until your DNS records updated, you will see it inactive.

3 Update your DNS records, add new CNAME. I am using Cloudflare but it can be OCI DNS Management as well.

Once the DNS records updated, it will become active. You can check the status using refresh button.

4 Create Approved Sender.

5 Update DNS records with Sender Policy Framework (SPF).

You can also check the SPF configuration document . It will look like this: v=spf1 include:rp.oracleemaildelivery.com include:ap.rp.oracleemaildelivery.com include:eu.rp.oracleemaildelivery.com ~all
Add a TXT record.

6 Create SMTP credentials following User >> Profile >> Saved Passwords >> SMTP credentials >> Generate Credentials. Save the values as password won't be displayed again.

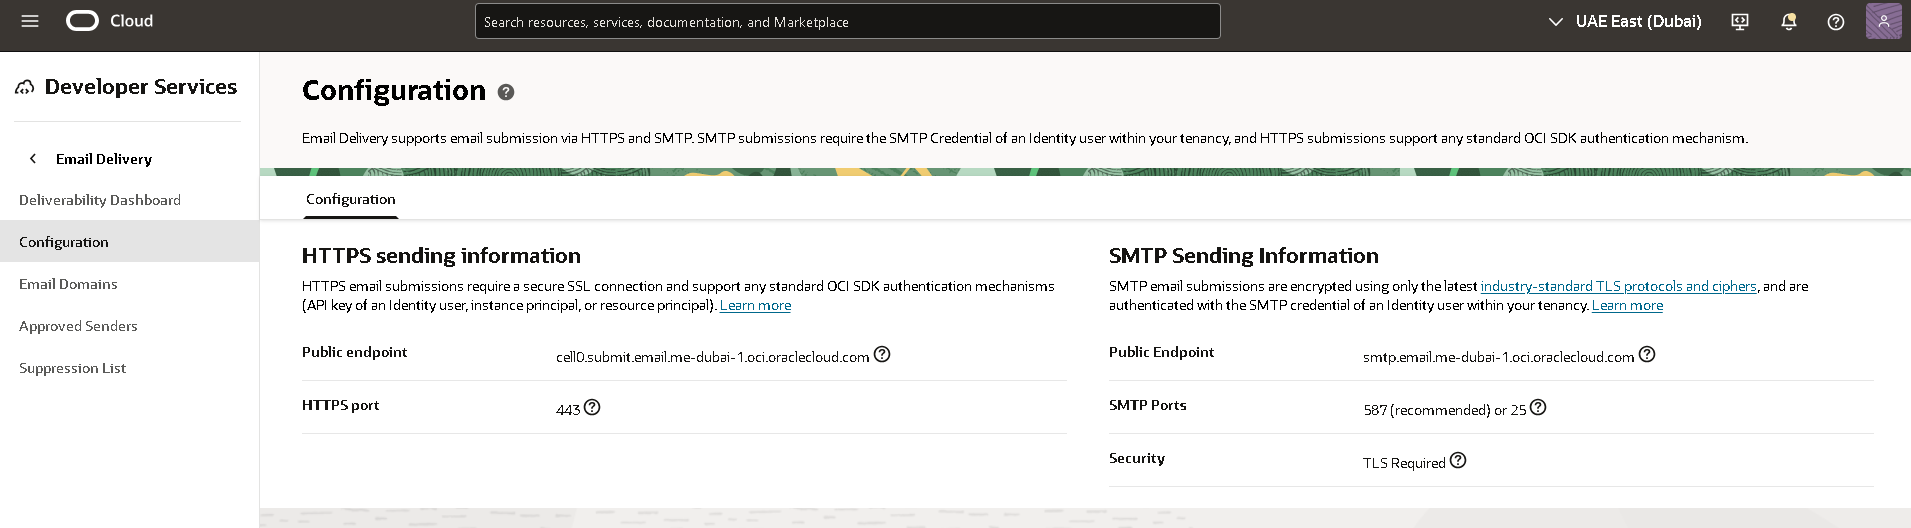
7 Get SMTP Sending Information by following Developer Sevrvices >> Email Delivery >> Configuration menu path. Copy public endpoint and port information.

8 Test sending email.

Option 1: Use APEX_MAIL

i Connect to your Autonomous Transaction Processing as ADMIN user using SQL client and configure the following SMTP parameters using APEX_INSTANCE_ADMIN.SET_PARAMETER.

ii Send a test email using APEX SQL Workshop >> SQL Commands specifying the approved sender.

There was a delay of minutes but I receieved the email.


Option 2: Use Mailx on OEL 8

i Install and configure mailx.
Then email was sent almost instantly.


References:
1.Email Delivery Service Documentation
2.Comprehensive Guide to Testing OCI Email Delivery Monir's guide was excellent, basicaly I followed the steps in hios post
3.Integrating Oracle APEX with Email Delivery Emil Delivery service has a good documentation for integrating the service with different applications
4.APEX_MAIL Package specification
5.OCI Regions and Region Keys

Tuesday, December 31, 2024

Deploying Container Instances Using Container Image From OCI Container Registry

When deploying containers using container instances service with images from a private registry either you have to provide user name and password or you can let container instances pull images from container registry . Here are the steps:

1 Create a dynamic group with Container Instances as the resource type. Add a rule with the following syntax:

ALL {resource.type='computecontainerinstance'}

2 Write the following policy to grant access for the dynamic group:

Allow dynamic-group ContainerInstanceDynamicGroup to read repos in tenancy

Note

CREATE_CONTAINER_INSTANCE work request will fail with the following message if you try to pull the image from a private registry without authentication.

A container's image could not be pulled because the image does not exist or requires authorization.

Pushing Container Images to Private OCI Container Registry

Once it's configured then it's forgotten until you need it again. So I've changed my laptop and had to reconfigure it again. Here are the steps:

1 Identify your region key from this list.

2 Identify your Object storage namespace from tenancy details page.

3 Identify your user name and build the user name string in the following format:

{tenancy-namespace}/{username}


If it's federated the format will be:
{tenancy-namespace}/oracleidentitycloudservice/{username}

4 Use your auth token as password.

Finally it should look like this:

Thursday, November 2, 2023

Using Object Storage as local file system with OCIFS

For using object storage like a file system, we used to and still have Storage Gateway to mount OCI Object Storage like an NFS mount target. It was only available on Linux 7, it required Docker and some resources (not small). For Windows rclone , a third party solution was the answer, and I wrote about it here in one of my old blog post

Now we have another alternative, recently announced OCIFS, pretty much does the same thing. It requires Oracle Linux 8 or later, and less demanding resources.

1 Installation is easy, on OLE8 instance, I ran dnf install command. And as you see it has a very small size.

[opc@ocifs-demo ~]$ sudo dnf install ocifs
Total download size: 156 k
Installed size: 360 k
Is this ok [y/N]: y
Downloading Packages:
(1/2): ocifs-1.1.0-2.el8.x86_64.rpm               824 kB/s |  73 kB     00:00
(2/2): fuse-2.9.7-16.0.1.el8.x86_64.rpm           446 kB/s |  83 kB     00:00
-----------------------------------------------------------------------------
Total                                             824 kB/s | 156 kB     00:00

2 For authentication I used API Key method. I have just copied my OCI CLI config file and key file to default locations, so I didn't have to pass any parameters. I didn't even install cli itself. Then I mount object storage bucket "ocifs-mounted-bucket" to "mydir" folder

[opc@ocifs-demo ~]$ ocifs ocifs-mounted-bucket mydir
[opc@ocifs-demo ~]$ cd mydir/
[opc@ocifs-demo mydir]$ mkdir new-folder-01
[opc@ocifs-demo mydir]$ mkdir new-folder-02
[opc@ocifs-demo mydir]$ history > new-folder-01/history.txt

Note

If your instance is running on OCI, you can also use instance principals for authentication

ocifs --auth=instance_principal ocifs-mounted-bucket mydir

For non-default config file, you can use config parameter for passing config file location

ocifs --auth=api_key --config=~/my_config ocifs-mounted-bucket mydir

3 Can be unmounted with any of these commands

fusermount -u mydir
sudo umount mydir

By the way, there is a Python library with the same name, ocifs which also enables python to use object storage like a file system.


References:
1. OCI Documentation: Storage Gateway
2. RClone: Mounting Object Storage on Windows
3. OCI Blog: Introducing OCIFS
4. OCI Documentation: OCIFS Utility
5. OCI Documentation: Install OCI CLI on OLE8
6. Oracle GitHub: OCIFS Python Library

Wednesday, October 11, 2023

How fast can I launch multiple OCI compute instances using Java SDK? #JoelKallmanDay

When I saw Tim Hall's blog post about #JoelKallmanDay it touched my heart. If you are somehow interested with Oracle APEX you probably know who Joel Kallman is. He meant a lot to the community. He is missed by the people all around the world, by the people he didn’t meet face to face. I wish this blog post was about APEX, maybe next year...

This one was waiting in my stash for long time as I wasn't happy about the dirty POC code and didn't have the time to refactor it. Actually it is about a really niche and cool requirement and second part of something I've posted in the past .

So let me start with a little context. Can you imagine how the big e-commerce platforms get ready for their peak seasons? This is about a software house who is highly specialized in load testing e-commerce applications. They have their own platform where e-commerce users prepare their test scenarios, and launch hundreds of thousands individual web agents to test the application for like 30 minutes. Under the hood the actual testing platform provisions tens (or hundreds) of compute instances, deploy the test code and runs it. Once the desired testing duration ends, all the compute instances are terminated. Perfect use-case that's possible only on cloud! This was one of the cool use-cases I've seen. Although the application is polyglot, they have chosen Java to code the instance creation part. So here we start.

My starting point is as usual OCI Online Documentation SDK for Java. The documents have links to Maven repository where I can just include the dependencies in my POM file . And there is an Oracle GitHub repository with quick start, installation and examples that will get me started in minutes. I've quickly located example code for creating a compute instance. The sample code is huge, it is creating everything from scratch, not only the compute instance but also VCN, subnet, gateways, etc. It is a comprehensive example, kudos to the team.

1I need a very quick test on how fast I can create instances. So here is a simplified test code which is getting all required inputs from environment variables (region, AD, subnet, compartment, image, and shape identifiers already that already exist), original sample is using waiters so I keep it just to see how convenient to wait my instances to reach a certain state (running)

And if I just test it with 5 instances to be created, the output is:

-----------------------------------------------------------------------
ocid1.instance.oc1.uk-london-1.... created in 36244 ms
ocid1.instance.oc1.uk-london-1.... created in 32845 ms
ocid1.instance.oc1.uk-london-1.... created in 32102 ms
ocid1.instance.oc1.uk-london-1.... created in 31995 ms
ocid1.instance.oc1.uk-london-1.... created in 62075 ms
Total execution time in seconds: 196
-----------------------------------------------------------------------

I am provisioning instances one by one and waiting for the instance to transition into RUNNING state. It took around ~30 seconds to provision a compute instance and see it in running state. Not bad at all. But this is not good enough, for extreme cases my customer needs tens of instances, can we do better?

2So I think I don't need to wait for the compute instance to reach running state before provisioning the other one, as long as I have the OCIDs of instances, I can come back to check the state later.

This time since expecting to wait less, I test it with 10 instances. Here is the output:

-----------------------------------------------------------------------
ocid1.instance.oc1.uk-london-1.... created in 2427 ms
ocid1.instance.oc1.uk-london-1.... created in 878 ms
ocid1.instance.oc1.uk-london-1.... created in 1041 ms
ocid1.instance.oc1.uk-london-1.... created in 982 ms
ocid1.instance.oc1.uk-london-1.... created in 971 ms
ocid1.instance.oc1.uk-london-1.... created in 772 ms
ocid1.instance.oc1.uk-london-1.... created in 743 ms
ocid1.instance.oc1.uk-london-1.... created in 754 ms
ocid1.instance.oc1.uk-london-1.... created in 972 ms
ocid1.instance.oc1.uk-london-1.... created in 812 ms
Total execution time in seconds: 12
-----------------------------------------------------------------------

This is a lot better, it is down to ~1 second per instance from 30 seconds per instance. I wonder if this can get any better. It is still synchronous call, one by one.

3What happens if we make it asynchronous? For this purpose I am using AsyncHandler which enables you with callback functions. Compute client also takes a different form: ComputeAsyncClient, input is the same. I do some concurrent processing with Futures , just to see if threads are done and collect the compute instance OCIDs

I again test it with 10 instances. Here is the output:

-----------------------------------------------------------------------
work requested in 391 ms
work requested in 14 ms
work requested in 10 ms
work requested in 9 ms
work requested in 7 ms
work requested in 5 ms
work requested in 6 ms
work requested in 7 ms
work requested in 4 ms
test-9 - ocid1.instance.oc1.uk-london-1....
test-10 - ocid1.instance.oc1.uk-london-1....
test-1 - ocid1.instance.oc1.uk-london-1....
test-4 - ocid1.instance.oc1.uk-london-1....
test-5 - ocid1.instance.oc1.uk-london-1....
test-6 - ocid1.instance.oc1.uk-london-1....
test-7 - ocid1.instance.oc1.uk-london-1....
test-8 - ocid1.instance.oc1.uk-london-1....
test-3 - ocid1.instance.oc1.uk-london-1....
test-2 - ocid1.instance.oc1.uk-london-1....
Total execution time in seconds: 2
-----------------------------------------------------------------------

As you can see from the output, there is no order because it is asynchronous and randomly created depending on thread execution order. It is blazing fast, took 2 seconds in total to create 10 instances!

Notes

What if I get greedy and try a larger batch? Then I get an error message because of request throttling protection.

Here is a little script to clean-up that can be used during tests.


References:
1. OCI Documentation: SDK for Java
2. Oracle GitHub Repository: SDK for Java
3. Oracle GitHub Repository: CreateInstanceExample.java
4. Tutorial: java.util.concurrent.Future
5. OCI Documentation: Request Throttling
6. OCI Documentation: Finding Instances

Monday, October 9, 2023

How to clone boot volume cross tenancy including Free Tier

In this blog I try to write about unusual things, not always possible though. I prefer to write beacuse mostly for myself to remember what was the solution, second to share with friends and customers. This is one of the interesting ones.

The question is "One of my ex-employees has a demo environment in his Free Tier tenancy (which means seeded credits already spent/expired) and I want to move the compute instance (Always Free Micro Shape) to my paid company tenancy". If you take a close look at the documents you will find out that the block volume can be replicated accross data centers and regions . Volume backups are regional but you might also copy accross regions . But this is only possible within the tenancy. To be honest, this is strange because some customers use OCI Cloud with Organizations , parent/child relationship of their tenancies. But Free Tier is a blocker.

Next thing that comes to my mind is creating a custom image, and export/import image using Object Storage as explained here .

But as you see, since it's a Free Tier tenancy now we don't have the limit and the motivation.

So while searching for alternative, talking to PM I came accross this undocumented feature . Basically the solution playbook is saying if you setup proper policies in both tenancy (define the other tenancy and authorize it to access the resources), then using the cli or API you can clone a volume from one tenancy to another. Or restore a volume backup from tenancy to the other. So here is what I did.

1I have created the following policy in source Free Tier tenancy, the policy defines the target tenancy and authorize a group in target tenancy to clone a volume

Define tenancy NewTenancy as $TARGET_TENANCY_OCID
Define group NewTenancyIdentityGroup as $TARGET_TENANCY_GROUP_OCID
Admit group NewTenancyIdentityGroup of tenancy NewTenancy to use volumes 
in tenancy where ANY { request.operation='CreateVolume', 
request.operation='GetVolume', request.operation='CreateBootVolume', 
request.operation='GetBootVolume' }

2I have created the following policy in target tenancy, the policy defines the source tenancy and authorize a group to clone a volume, very similar to first one.

Define tenancy OldTenancy as $SOURCE_TENANCY_OCID
Endorse group NewTenancyIdentityGroup to use volumes 
in tenancy where ANY { request.operation='CreateVolume', 
request.operation='GetVolume', request.operation='CreateBootVolume', 
request.operation='GetBootVolume' }

3Then invoked the API with CLI to clone the boot volume in source tenancy ($BOOT_VOLUME_ID) with my profile connected to target tenancy

oci bv boot-volume create --profile=cross_tenancy_user_profile --debug \
--region=eu-frankfurt-1 --source-boot-volume-id $BOOT_VOLUME_ID  \
--display-name Cross-Tenancy-vm-e2micro-5 --compartment-id $COMPARTMENT_ID

Notes
1. Don't forget using compartments for your cli command
2. Also make sure the Group you are using in your target tenancy and the profile user can create block volume
3. If you get 404 - NotAuthorizedOrNotFound error message, most likely related to your policies
4. Policies are replicated to other regions from Home region, if you are working on a different region than your home region, take that into consideration
5. For same AD use clone, for different AD use backup restore
6. Although this seems to be the only way to copy block volume from a Free Tier without converting it to a paid tenancy, this feature can be very useful for moving large boot volumes and for bulk operations to move multiple boot volumes. It will be definitely easier than using Object Storage to export/import images which has a size limitation also.
7. Just imagine what other interesting use cases can be achieved with this admit/endorse policy setup


References:
1. Solution Playbook: Migrate Oracle Cloud Infrastructure volume data across tenancies
2. OCI CLI Command Reference : boot-volume » create
3. OCI Block Volume Documentation: BYOI Best Practices
4. OCI Block Volume Documentation: Copy Block Volume

Wednesday, October 4, 2023

Should I use security list or network security group or both to secure my OCI deployment?

Today I was in a customer call, it was a pretty straightforward scenario. The session turned into hands-on pretty fast, and I love it, sharing the curiosity and eagerness to solve the problem with technical people, few things can match that feeling. And as always we came to the point where we delve into the troubleshooting. So here we go...

The requirement is simple, deploy an Ubuntu server to host a demo application over HTTP port 80, a small VM in a public subnet with a public IP Address and supporting security rules. VCN is created with the wizard, and it comes with a Default Security List which is populated with 3 stateful ingress rules:

First rule enables SSH access to my host, the other two ICMP rules are there for debugging and they don't enable a ping response. All of them are stateful. And this is the Egress part:

There is one stateful egress rule which enables outgoing traffic to any destination with any protocol on any port. State will be important as we will find out later...

Security list is attached to subnet and enforced at all VNICs in the subnet. So setting general rules with security list makes sense, however we also need to open HTTP 80 port for one server and we don't want this for all servers in the subnet. For this purpose we use network security groups which is another type of virtual firewall that Oracle recommends over security lists. You can use security lists and network security groups together. How do the rules apply? At simplest: a union of all rules are applied to VNIC. Security list is tied to subnet so applies to all VNICs in the subnet, NSG is attached to individual VNIC, so it's granular. Here are the rules in our NSG:

First rule is allowing incoming TCP traffic on port 80 from any source, the second rule is allowing outgoing TCP traffic. And rules are stateless , which means connection tracking is disabled. Why would I want that? Maybe I am expecting high traffic, or maybe I was greedy and wanted everything at once.

Overall architecture can be simplified like this:

So we SSH into our Ubuntu server using our public IP, also add linux firewall rules by updating iptables as explained in detail on this tutorial .

All set, for a really quick dirty test, let's run python

And it works, but we quickly find out there is another problem. We can't access Ubuntu repositories to update the packages or install new ones. Although IPv6 in the error message is distracting, it doesn't work with IPv4 either. It is a problem with accessing the internet.

So after some debugging, we soon realize the problem is having overlapping stateful and stateless rules. Our stateful egress rule on the security list should be providing all the access we need towards internet. But it doesn't, why? Because our stateless egress rule in NSG is overlapping and overriding the SL as stateless has precedence over stateful. This is what documentation exactly warns us about.

If for some reason you use both stateful and stateless rules, 
and there's traffic that matches both a stateful and stateless rule 
in a particular direction (for example, ingress), the stateless rule 
takes precedence and the connection is not tracked. You would need 
a corresponding rule in the other direction (for example, egress, 
either stateless or stateful) for the response traffic to be allowed.

Lessons learned
1. Use stateful rules (which is default) unless I have a good reason to use stateless
2. If using stateless ingress always exactly match it with an egress rule, don't use a broader rule
3. Don't use overlapping stateless and stateful rules, as the stateless rule takes precedence and the connection is not tracked, thus acting different than expected.

How did we fix it?
On our NSG, we converted ingress rule from stateless to stateful, and removed egress rule as it's not needed anymore.

If we wanted to use stateless rules, then a viable solution will be restricting egress rule to exactly match the ingress thus protocol TCP, source port 80 and destination port any.


References:
1. OCI Security Rules: Stateful Versus Stateless Rules
2. Developer Tutorials: Free Tier: Install Apache and PHP on an Ubuntu Instance
3. Enabling Network Traffic to Ubuntu Images: Enabling Network Traffic to Ubuntu Images

Thursday, May 18, 2023

Different Ways to Access Cloud Resources from Autonomous Database

When working with DBMS_CLOUD package or cloud REST APIs , I need database instance to be authenticated and authorized. Mainly there are two ways of doing this.

1I can use my own credentials or any IAM users credentials. For this purpose I need to use DBMS_CLOUD.create_credential procedure that comes in three different signatures.

aI can create an Auth token from console or using cli

then using this token and my user I can create a credential. Just to avoid confusion with below script, I use my email address as username in my tenancy.

bAnother way is to introduce my API signing RSA keys to OCI, then use it to create a credential. For generating my own key pair I can use openssl as described here in official documentation . I can also use the console which can generate the keys for me and I can download it. Using console I can upload my existing keys too.

After the API key added to OCI, console will display a configuration that can be used with SDK, CLI or REST calls.

CLI doesn't offer a command for adding API keys but I can always use REST API with http raw request, again response will display required information to use API key with SDK and CLI

Note:Use \n as new line feed for formatting your encoded public/private key

Now I can use a different version of create_credential procedure

Note:Both credentials (Auth Token and API Key) are directly linked to my OCI IAM user.

2I can also use Resource Principals to authorize my ATP instance. Previous method is tied to an IAM user (notice both Auth Token and API Key are created under user), resource principal uses Dynamic Groups to identify the instance and IAM no user is required.

aFirst I need a Dynamic Group to identify my instances. I generally use tagging, but sometimes allowing all autonomous instances is also fine.

bThen with a policy I grant priviliges to the members of that dynamic group

Note:The resource principal token is cached for two hours. Therefore, if you change the policy or the dynamic group, you have to wait for two hours to see the effect of your changes. This note is from documentation .

Here is the complete list of cli commands with some outputs for the same purpose:

cAnd I connect to the database and enable Resource Principal to Access Oracle Cloud Infrastructure Resources .

Testing

1I can see that my credential is visible and enabled in all_credentials. For testing I am just listing objects under an object storage bucket

2I can list objects under a bucket using any of the credentials.

Here is some SQL for testing

Featured

Putting it altogether: How to deploy scalable and secure APEX on OCI

Oracle APEX is very popular, and it is one of the most common usecases that I see with my customers. Oracle Architecture Center offers a re...