Thursday, November 2, 2023

Back to the basics: Using Object Storage as local file system with OCIFS

For using object storage like a file system, we used to and still have Storage Gateway to mount OCI Object Storage like an NFS mount target. It was only available on Linux 7, it required Docker and some resources (not small). For Windows rclone , a third party solution was the answer, and I wrote about it here in one of my old blog post

Now we have another alternative, recently announced OCIFS, pretty much does the same thing. It requires Oracle Linux 8 or later, and less demanding resources.

1 Installation is easy, on OLE8 instance, I ran dnf install command. And as you see it has a very small size.

[opc@ocifs-demo ~]$ sudo dnf install ocifs
Total download size: 156 k
Installed size: 360 k
Is this ok [y/N]: y
Downloading Packages:
(1/2): ocifs-1.1.0-2.el8.x86_64.rpm               824 kB/s |  73 kB     00:00
(2/2): fuse-2.9.7-16.0.1.el8.x86_64.rpm           446 kB/s |  83 kB     00:00
-----------------------------------------------------------------------------
Total                                             824 kB/s | 156 kB     00:00

2 For authentication I used API Key method. I have just copied my OCI CLI config file and key file to default locations, so I didn't have to pass any parameters. I didn't even install cli itself. Then I mount object storage bucket "ocifs-mounted-bucket" to "mydir" folder

[opc@ocifs-demo ~]$ ocifs ocifs-mounted-bucket mydir
[opc@ocifs-demo ~]$ cd mydir/
[opc@ocifs-demo mydir]$ mkdir new-folder-01
[opc@ocifs-demo mydir]$ mkdir new-folder-02
[opc@ocifs-demo mydir]$ history > new-folder-01/history.txt

Note

If your instance is running on OCI, you can also use instance principals for authentication

ocifs --auth=instance_principal ocifs-mounted-bucket mydir

For non-default config file, you can use config parameter for passing config file location

ocifs --auth=api_key --config=~/my_config ocifs-mounted-bucket mydir

3 Can be unmounted with any of these commands

fusermount -u mydir
sudo umount mydir

By the way, there is a Python library with the same name, ocifs which also enables python to use object storage like a file system.


References:
1. OCI Documentation: Storage Gateway
2. RClone: Mounting Object Storage on Windows
3. OCI Blog: Introducing OCIFS
4. OCI Documentation: OCIFS Utility
5. OCI Documentation: Install OCI CLI on OLE8
6. Oracle GitHub: OCIFS Python Library

Wednesday, October 11, 2023

How fast can I launch multiple OCI compute instances using Java SDK? #JoelKallmanDay

When I saw Tim Hall's blog post about #JoelKallmanDay it touched my heart. If you are somehow interested with Oracle APEX you probably know who Joel Kallman is. He meant a lot to the community. He is missed by the people all around the world, by the people he didn’t meet face to face. I wish this blog post was about APEX, maybe next year...

This one was waiting in my stash for long time as I wasn't happy about the dirty POC code and didn't have the time to refactor it. Actually it is about a really niche and cool requirement and second part of something I've posted in the past .

So let me start with a little context. Can you imagine how the big e-commerce platforms get ready for their peak seasons? This is about a software house who is highly specialized in load testing e-commerce applications. They have their own platform where e-commerce users prepare their test scenarios, and launch hundreds of thousands individual web agents to test the application for like 30 minutes. Under the hood the actual testing platform provisions tens (or hundreds) of compute instances, deploy the test code and runs it. Once the desired testing duration ends, all the compute instances are terminated. Perfect use-case that's possible only on cloud! This was one of the cool use-cases I've seen. Although the application is polyglot, they have chosen Java to code the instance creation part. So here we start.

My starting point is as usual OCI Online Documentation SDK for Java. The documents have links to Maven repository where I can just include the dependencies in my POM file . And there is an Oracle GitHub repository with quick start, installation and examples that will get me started in minutes. I've quickly located example code for creating a compute instance. The sample code is huge, it is creating everything from scratch, not only the compute instance but also VCN, subnet, gateways, etc. It is a comprehensive example, kudos to the team.

1I need a very quick test on how fast I can create instances. So here is a simplified test code which is getting all required inputs from environment variables (region, AD, subnet, compartment, image, and shape identifiers already that already exist), original sample is using waiters so I keep it just to see how convenient to wait my instances to reach a certain state (running)

And if I just test it with 5 instances to be created, the output is:

-----------------------------------------------------------------------
ocid1.instance.oc1.uk-london-1.... created in 36244 ms
ocid1.instance.oc1.uk-london-1.... created in 32845 ms
ocid1.instance.oc1.uk-london-1.... created in 32102 ms
ocid1.instance.oc1.uk-london-1.... created in 31995 ms
ocid1.instance.oc1.uk-london-1.... created in 62075 ms
Total execution time in seconds: 196
-----------------------------------------------------------------------

I am provisioning instances one by one and waiting for the instance to transition into RUNNING state. It took around ~30 seconds to provision a compute instance and see it in running state. Not bad at all. But this is not good enough, for extreme cases my customer needs tens of instances, can we do better?

2So I think I don't need to wait for the compute instance to reach running state before provisioning the other one, as long as I have the OCIDs of instances, I can come back to check the state later.

This time since expecting to wait less, I test it with 10 instances. Here is the output:

-----------------------------------------------------------------------
ocid1.instance.oc1.uk-london-1.... created in 2427 ms
ocid1.instance.oc1.uk-london-1.... created in 878 ms
ocid1.instance.oc1.uk-london-1.... created in 1041 ms
ocid1.instance.oc1.uk-london-1.... created in 982 ms
ocid1.instance.oc1.uk-london-1.... created in 971 ms
ocid1.instance.oc1.uk-london-1.... created in 772 ms
ocid1.instance.oc1.uk-london-1.... created in 743 ms
ocid1.instance.oc1.uk-london-1.... created in 754 ms
ocid1.instance.oc1.uk-london-1.... created in 972 ms
ocid1.instance.oc1.uk-london-1.... created in 812 ms
Total execution time in seconds: 12
-----------------------------------------------------------------------

This is a lot better, it is down to ~1 second per instance from 30 seconds per instance. I wonder if this can get any better. It is still synchronous call, one by one.

3What happens if we make it asynchronous? For this purpose I am using AsyncHandler which enables you with callback functions. Compute client also takes a different form: ComputeAsyncClient, input is the same. I do some concurrent processing with Futures , just to see if threads are done and collect the compute instance OCIDs

I again test it with 10 instances. Here is the output:

-----------------------------------------------------------------------
work requested in 391 ms
work requested in 14 ms
work requested in 10 ms
work requested in 9 ms
work requested in 7 ms
work requested in 5 ms
work requested in 6 ms
work requested in 7 ms
work requested in 4 ms
test-9 - ocid1.instance.oc1.uk-london-1....
test-10 - ocid1.instance.oc1.uk-london-1....
test-1 - ocid1.instance.oc1.uk-london-1....
test-4 - ocid1.instance.oc1.uk-london-1....
test-5 - ocid1.instance.oc1.uk-london-1....
test-6 - ocid1.instance.oc1.uk-london-1....
test-7 - ocid1.instance.oc1.uk-london-1....
test-8 - ocid1.instance.oc1.uk-london-1....
test-3 - ocid1.instance.oc1.uk-london-1....
test-2 - ocid1.instance.oc1.uk-london-1....
Total execution time in seconds: 2
-----------------------------------------------------------------------

As you can see from the output, there is no order because it is asynchronous and randomly created depending on thread execution order. It is blazing fast, took 2 seconds in total to create 10 instances!

Notes

What if I get greedy and try a larger batch? Then I get an error message because of request throttling protection.

Here is a little script to clean-up that can be used during tests.


References:
1. OCI Documentation: SDK for Java
2. Oracle GitHub Repository: SDK for Java
3. Oracle GitHub Repository: CreateInstanceExample.java
4. Tutorial: java.util.concurrent.Future
5. OCI Documentation: Request Throttling
6. OCI Documentation: Finding Instances

Monday, October 9, 2023

Back to the basics: How to clone boot volume cross tenancy including Free Tier

In this blog I try to write about unusual things, not always possible though. I prefer to write beacuse mostly for myself to remember what was the solution, second to share with friends and customers. This is one of the interesting ones.

The question is "One of my ex-employees has a demo environment in his Free Tier tenancy (which means seeded credits already spent/expired) and I want to move the compute instance (Always Free Micro Shape) to my paid company tenancy". If you take a close look at the documents you will find out that the block volume can be replicated accross data centers and regions . Volume backups are regional but you might also copy accross regions . But this is only possible within the tenancy. To be honest, this is strange because some customers use OCI Cloud with Organizations , parent/child relationship of their tenancies. But Free Tier is a blocker.

Next thing that comes to my mind is creating a custom image, and export/import image using Object Storage as explained here .

But as you see, since it's a Free Tier tenancy now we don't have the limit and the motivation.

So while searching for alternative, talking to PM I came accross this undocumented feature . Basically the solution playbook is saying if you setup proper policies in both tenancy (define the other tenancy and authorize it to access the resources), then using the cli or API you can clone a volume from one tenancy to another. Or restore a volume backup from tenancy to the other. So here is what I did.

1I have created the following policy in source Free Tier tenancy, the policy defines the target tenancy and authorize a group in target tenancy to clone a volume

Define tenancy NewTenancy as $TARGET_TENANCY_OCID
Define group NewTenancyIdentityGroup as $TARGET_TENANCY_GROUP_OCID
Admit group NewTenancyIdentityGroup of tenancy NewTenancy to use volumes 
in tenancy where ANY { request.operation='CreateVolume', 
request.operation='GetVolume', request.operation='CreateBootVolume', 
request.operation='GetBootVolume' }

2I have created the following policy in target tenancy, the policy defines the source tenancy and authorize a group to clone a volume, very similar to first one.

Define tenancy OldTenancy as $SOURCE_TENANCY_OCID
Endorse group NewTenancyIdentityGroup to use volumes 
in tenancy where ANY { request.operation='CreateVolume', 
request.operation='GetVolume', request.operation='CreateBootVolume', 
request.operation='GetBootVolume' }

3Then invoked the API with CLI to clone the boot volume in source tenancy ($BOOT_VOLUME_ID) with my profile connected to target tenancy

oci bv boot-volume create --profile=cross_tenancy_user_profile --debug \
--region=eu-frankfurt-1 --source-boot-volume-id $BOOT_VOLUME_ID  \
--display-name Cross-Tenancy-vm-e2micro-5 --compartment-id $COMPARTMENT_ID

Notes
1. Don't forget using compartments for your cli command
2. Also make sure the Group you are using in your target tenancy and the profile user can create block volume
3. If you get 404 - NotAuthorizedOrNotFound error message, most likely related to your policies
4. Policies are replicated to other regions from Home region, if you are working on a different region than your home region, take that into consideration
5. For same AD use clone, for different AD use backup restore
6. Although this seems to be the only way to copy block volume from a Free Tier without converting it to a paid tenancy, this feature can be very useful for moving large boot volumes and for bulk operations to move multiple boot volumes. It will be definitely easier than using Object Storage to export/import images which has a size limitation also.
7. Just imagine what other interesting use cases can be achieved with this admit/endorse policy setup


References:
1. Solution Playbook: Migrate Oracle Cloud Infrastructure volume data across tenancies
2. OCI CLI Command Reference : boot-volume » create
3. OCI Block Volume Documentation: BYOI Best Practices
4. OCI Block Volume Documentation: Copy Block Volume

Wednesday, October 4, 2023

Back to the basics: Should I use security list or network security group or both to secure my OCI deployment?

Today I was in a customer call, it was a pretty straightforward scenario. The session turned into hands-on pretty fast, and I love it, sharing the curiosity and eagerness to solve the problem with technical people, few things can match that feeling. And as always we came to the point where we delve into the troubleshooting. So here we go...

The requirement is simple, deploy an Ubuntu server to host a demo application over HTTP port 80, a small VM in a public subnet with a public IP Address and supporting security rules. VCN is created with the wizard, and it comes with a Default Security List which is populated with 3 stateful ingress rules:

First rule enables SSH access to my host, the other two ICMP rules are there for debugging and they don't enable a ping response. All of them are stateful. And this is the Egress part:

There is one stateful egress rule which enables outgoing traffic to any destination with any protocol on any port. State will be important as we will find out later...

Security list is attached to subnet and enforced at all VNICs in the subnet. So setting general rules with security list makes sense, however we also need to open HTTP 80 port for one server and we don't want this for all servers in the subnet. For this purpose we use network security groups which is another type of virtual firewall that Oracle recommends over security lists. You can use security lists and network security groups together. How do the rules apply? At simplest: a union of all rules are applied to VNIC. Security list is tied to subnet so applies to all VNICs in the subnet, NSG is attached to individual VNIC, so it's granular. Here are the rules in our NSG:

First rule is allowing incoming TCP traffic on port 80 from any source, the second rule is allowing outgoing TCP traffic. And rules are stateless , which means connection tracking is disabled. Why would I want that? Maybe I am expecting high traffic, or maybe I was greedy and wanted everything at once.

Overall architecture can be simplified like this:

So we SSH into our Ubuntu server using our public IP, also add linux firewall rules by updating iptables as explained in detail on this tutorial .

All set, for a really quick dirty test, let's run python

And it works, but we quickly find out there is another problem. We can't access Ubuntu repositories to update the packages or install new ones. Although IPv6 in the error message is distracting, it doesn't work with IPv4 either. It is a problem with accessing the internet.

So after some debugging, we soon realize the problem is having overlapping stateful and stateless rules. Our stateful egress rule on the security list should be providing all the access we need towards internet. But it doesn't, why? Because our stateless egress rule in NSG is overlapping and overriding the SL as stateless has precedence over stateful. This is what documentation exactly warns us about.

If for some reason you use both stateful and stateless rules, 
and there's traffic that matches both a stateful and stateless rule 
in a particular direction (for example, ingress), the stateless rule 
takes precedence and the connection is not tracked. You would need 
a corresponding rule in the other direction (for example, egress, 
either stateless or stateful) for the response traffic to be allowed.

Lessons learned
1. Use stateful rules (which is default) unless I have a good reason to use stateless
2. If using stateless ingress always exactly match it with an egress rule, don't use a broader rule
3. Don't use overlapping stateless and stateful rules, as the stateless rule takes precedence and the connection is not tracked, thus acting different than expected.

How did we fix it?
On our NSG, we converted ingress rule from stateless to stateful, and removed egress rule as it's not needed anymore.

If we wanted to use stateless rules, then a viable solution will be restricting egress rule to exactly match the ingress thus protocol TCP, source port 80 and destination port any.


References:
1. OCI Security Rules: Stateful Versus Stateless Rules
2. Developer Tutorials: Free Tier: Install Apache and PHP on an Ubuntu Instance
3. Enabling Network Traffic to Ubuntu Images: Enabling Network Traffic to Ubuntu Images

Thursday, September 28, 2023

Back to the basics: How to find users who didn't activate MFA on OCI

Today this came up, I needed to find all the users in a certain Group in my identity domain. Of course console provides this information, if I look at details of all users one by one! But I don't want to do this, it is time consuming, error prone and doesn't scale. Imagine having hundred users!

1 OCI CLI should also provide this information. But not probably with one API call, so let's look at the following script:

First I am trying to queryonly the OCID of the Group with name"Administrators"

oci iam group list --compartment-id $TENANCY_OCID --name Administrators \
 --query 'data[*]."id"' --raw-output

Then after couple of string operations to eliminate paranthesis and double quotes. I am passing the output of the first command which is the OCID of Administrators Group to a second command. This time to find the users with a specific group assignment, and only interested in id and name columns. And a table like output would be better compared to default JSON.

oci iam group list-users --compartment-id $TENANCY_OCID --group-id $GROUP_OCID \
 --query 'data[*].{OCID:id,Name:name}' --output table

As you can see, it is quite handy and reliable. You can check Christian Gohmann's post for neat and tidy samples, link in the references.

2 CLI is good yet not the easiest way though. Especially when combining multiple commands, it requires a certain level of expertise on scripting. So is there an easier solution? Sure there is: Steampipe Since my colleague Jean-Pierre showed this, I am loving it. It has an OCI Plugin , and here is the GitHub Page of the plugin code. Once you install and run it, you will see it makes your day easy as joining couple of tables with an SQL is.

It supports PostgreSQL syntax, and using plugins you can use it for AWS, Azure or OCI. Or you can write your own. Here is another query that I needed. List of users who didn't activated MFA with last login time:

Steampipe Plugin documentation has hundreds of queries provided for different use cases.

Note: From this point on I am sharing my notes on how to do things

Install OCI CLI: On my WSL2 Ubuntu system, I needed to re-install cli. Quickstart is quite handy, script is doing everything for you. Once you install it, you need to configure it by following the prompts:

oci setup config

Extending Steampipe OCI Plugin: I realized the Last Login Date data was not available on plugin table but available on oci cli. So I decided to extend the plugin code. For this purpose:

1.I cloned the git repository as described in GitHub Page .

git clone https://github.com/turbot/steampipe-plugin-oci.git
cd steampipe-plugin-oci
2. I added last_successful_login_time into table definition file table_oci_identity_user.go
3. Installed Go on my Ubuntu host, and added to my path
rm -rf /usr/local/go && tar -C /usr/local -xzf go1.21.1.linux-amd64.tar.gz
export PATH=$PATH:/usr/local/go/bin
4. Then build the plugin from source and configure it as described on plugin GitHub page
make
cp config/* ~/.steampipe/config
vi ~/.steampipe/config/oci.spc


References:
1. OCI CLI Search and Filtering: https://christian-gohmann.de/2021/03/10/forma...
2. Steampipe: https://hub.steampipe.io/plugins/turbot/oci
3. Steampipe OCI Plugin: https://github.com/turbot/steampipe-plugin-oci
4. OCI CLI Installation: https://docs.oracle.com/en-us/iaas/Content/API/SDKDocs/cliin...
5. Install Go: https://go.dev/doc/install
6. Steampipe OCI Plugin Sample Queries: https://hub.steampipe.io/mods/turbot/oc...

Friday, September 22, 2023

Run Autonomous Database, ORDS and APEX on your laptop with single command!

Last week was full of excitement, you know it is that time of the year: Cloud World You can watch the recaps! Lots of announcements, new partnerships, product launches, demos, tons of interesting sessions and chance to connect with gurus, product managers and community! I didn't have the chance to be there yet, maybe next year...

One of the announcements was a container image for Autonomous database made available! It has built-in tools like Database Actions (SQL Developer Web, Performance Hub, etc.), ORDS and APEX, and Mongo API is enabled. Just the right things for developing locally without loosing anytime. Here is the offical documentation and the GitHub Page where you can find all the details.

So here is what I did to have my container running on my Windows laptop within WSL2 Ubuntu.

1We start with podman installation (you can also use docker)

2When the container runs the following ports will be exposed:

Port Description
1521 TLS
1522 mTLS
8443 HTTPS port for ORDS / APEX and Database Actions
27017 Mongo API ( MY_ATP )
I recommend pulling the image first. Size is around 10GB and it can take a while. You can run the container with the following command.

3 Now we need to change ADMIN user password. There is a script provided for this purpose and we need to execute it by connecting to container.

4 We are ready to explore the tools already provided. Point your browser to https://localhost:8443/ords/my_atp/ and a landing page will welcome us.

5 APEX and Database Actions are also made available, no installation, no configuration, start building immediately.

6 How about connecting to database? Easy, for mTLS it requires a wallet. You can copy the wallet to any location on your local filesystem, export TNS_ADMIN then connect.


Note: You can safely skip this first part, unless you want to update your WSL2 Ubuntu. I was using a manual built experimental kernel because of a really weird debugging requirement I had in the past and I didn't need it anymore. So I needed to replace it but never had the chance or motivation, but this time it was inevitable. So writing this section as a reference for my future self.


References:
1. ADB Free GitHub Page: https://github.com/oracle/adb-free
2. Podman Documentation: https://podman.io/docs/installation
3. Instal Docker on WSL2: https://nickjanetakis.com/blog/install-docker-in-wsl-2-without-do...
4. Autostart Docker Daemon: https://blog.nillsf.com/index.php/2020/06/29/how-to-autom...
5. Upgrade Ubuntu: https://askubuntu.com/questions/1428423/upgrade-ubuntu-in-wsl...
6. Reboot Ubuntu: https://superuser.com/questions/1126721/rebooting-ubuntu-o...

Tuesday, September 5, 2023

How to discover tenancy details and self OCID with Autonomous database

Know thyself inscribed on Temple of Apollo, it is the door to true wisdom. While scripting or coding for automating a process, I often need the database to be self aware and discover information like tenancy, OCID and region etc. So here is how you can obtain details on Autonomous database

cloud_identity column contains a json formatted text containing OCIDs for tenancy, autonomous database, compartment etc. And if you are scripting/coding you will need to extract those json attributes, you can use JSON_TABLE function. This will give you nice and clean values that you can directly use.

Tuesday, June 13, 2023

Back to the basics: How to connect Autonomous Database using java JDBC with or without a wallet

Sometimes it is good to go back to the basics. Connection between Autonomous database and the client is always encrypted with TLS. Depending on the network access type, either it has to be mutual (mTLS) or TLS only. Why this is important? Well, I can think of couple good reasons. If I allow "secure access from everywhere" to my database then I would want to ensure only the clients that I shared necessary information (in this case a wallet) should be able to access it. Other logical options are allowing access only from the network addresses that I know, like my own IP address or from private network that I trust.

So I will be writing a small piece of java code to test it. It is all about setting my environment and constructing JDBC connection string. So at the minimum I add jdbc driver to my pom file. You might want to use UCP for your applications, it will be the same. I will be following official documentation

1 In order to connect with a Wallet, I download the wallet from console, unzip it then use the folder as my TNS_ADMIN. Connection string looks like

jdbc:oracle:thin:@{CONNECT_DENTIFIER}?{TNS_ADMIN}
As you will see there are different ways to construct it: Wallet folder can be set as a system property or passed as a query string. Here is a small sample code

2 If I can restrict access to my autonomous database with an access controll list (ACL) or connect with a private endpoint in a private subnet then I can uncheck Require mutual TLS (mTLS) authentication checkbox then I can connect to this database without a wallet. Connection is still encrypted with TLS.

Wednesday, May 24, 2023

Back to the basics: Tracking Cloud Usage and Cost with Autonomous Database Using SQL

This was long time in my waiting list, "How do I track usage/cost of my cloud resources?" A very common question that I hear a lot. Let me walk through the options I know:

1 I can use cost analysis tool. It is very handy for visualizations, I can add filters, change grouping dimensions. I can have daily and monthly reports including forecast for the interested period. I can also save my reports, download report output in different formats. I can even schedule reports and it will be created under a bucket. Down sides are: it is built for visual consumption, extracting data is manual, I can't go beyond one year.

2 I can use cost and usage reports. They are csv files generated every six hours in an Oracle owned bucket but can be accessed with some cross tenancy configuration. These files are retained for one year. See official documentation for details. I need to find other tools to import and analyze data in csv files. Here is a really good example for this purpose.

3 I can also use the REST API to get a Usage Summary. Similar is also available in cli. Depending on the requirement this might be a good fit, but most of the time it is too much for most of the customers.

4 I can configure an Autonomous Database and use it to Track Oracle Cloud Infrastructure Resources, Cost and Usage Reports with Autonomous Database Views . I am going to focus on this because with minimal effort it can deliver great value. I can query data with simple sql, integrate it into any reporting or monitoring tool and I can go beyond one year limit by storing csv report data inside my database. Here I will list steps and some sample scripts:

a There are some prerequsite steps that need to be completed. You can check official documentation or my other blog post where I discuss resource principals to access OCI resources.

Note:The resource principal token is cached for two hours. Therefore, if you change the policy or the dynamic group, you have to wait for two hours to see the effect of your changes. This note is from documentation .

b Once the policies and resource principals are in place, I can use resourse views. There are multiple views but I am interested in two of them: OCI_COST_DATA and OCI_USAGE_DATA. I didn't check the source but I am guessing PIPELINED functions and/or external tables are involved. I could just use the views but there are two problems I need to solve: running query on the view is slow, and underlying data is changing, data older than one year will vanish. For this reason I am going to create a materialized view based on an existing table. This temporary table will be refreshed every 6 hours and in an another table I will be accumulating all the data. I am creating primary keys to detect the difference for each run.

c I am creating a procedure which will refresh the temp table with latest data, merge new rows into actual table, then schedule the next run.

d I just need to execute the procedure once, then the ball will be rolling on its own.

e DBMS_SCHEDULER job details can be tracked with the following views.

f Finally I will have all the data accumulated in my table, even long after the csv usage/cost files are deleted. Here are some SQL queries to start with.

Thursday, May 18, 2023

Different Ways to Access Cloud Resources from Autonomous Database

When working with DBMS_CLOUD package or cloud REST APIs , I need database instance to be authenticated and authorized. Mainly there are two ways of doing this.

1I can use my own credentials or any IAM users credentials. For this purpose I need to use DBMS_CLOUD.create_credential procedure that comes in three different signatures.

aI can create an Auth token from console or using cli

then using this token and my user I can create a credential. Just to avoid confusion with below script, I use my email address as username in my tenancy.

bAnother way is to introduce my API signing RSA keys to OCI, then use it to create a credential. For generating my own key pair I can use openssl as described here in official documentation . I can also use the console which can generate the keys for me and I can download it. Using console I can upload my existing keys too.

After the API key added to OCI, console will display a configuration that can be used with SDK, CLI or REST calls.

CLI doesn't offer a command for adding API keys but I can always use REST API with http raw request, again response will display required information to use API key with SDK and CLI

Note:Use \n as new line feed for formatting your encoded public/private key

Now I can use a different version of create_credential procedure

Note:Both credentials (Auth Token and API Key) are directly linked to my OCI IAM user.

2I can also use Resource Principals to authorize my ATP instance. Previous method is tied to an IAM user (notice both Auth Token and API Key are created under user), resource principal uses Dynamic Groups to identify the instance and IAM no user is required.

aFirst I need a Dynamic Group to identify my instances. I generally use tagging, but sometimes allowing all autonomous instances is also fine.

bThen with a policy I grant priviliges to the members of that dynamic group

Note:The resource principal token is cached for two hours. Therefore, if you change the policy or the dynamic group, you have to wait for two hours to see the effect of your changes. This note is from documentation .

Here is the complete list of cli commands with some outputs for the same purpose:

cAnd I connect to the database and enable Resource Principal to Access Oracle Cloud Infrastructure Resources .

Testing

1I can see that my credential is visible and enabled in all_credentials. For testing I am just listing objects under an object storage bucket

2I can list objects under a bucket using any of the credentials.

Here is some SQL for testing

Wednesday, May 17, 2023

Putting it altogether: How to deploy scalable and secure APEX on OCI

Oracle APEX is very popular, and it is one of the most common usecases that I see with my customers. Oracle Architecture Center offers a reference architecture for this purpose: Deploy a secure production-ready Oracle Autonomous Database and Oracle APEX application . If you are comfortable with terraform or willing to learn it, I would definitely recommend using it. Even if it doesn't fit your requirements entirely it is a good starting point.

Having said that, I wanted to crack it open and see what's in it (I know typical boy's fun...), and in the end I come up with a series of blog posts while building the reference architecture piece by piece. Good for understanding what is under the hood and excellent for showing the value of terraform after doing all the work manually.

So here I start with the final architecture. I will explain the components and provide the links while doing so to help you build your own.

Quick links to the posts in the series

Part 1: Accessing Autonomous Database over Private Endpoint using SQL Developer
Part 2: Installing Customer Managed ORDS on Compute Instance for Autonomous Database
Part 3: Serving APEX in Private Subnet behind Public Load Balancer
Part 4: Securing APEX Admin Resources with Load Balancer
Part 5: Autoscaling ORDS servers in private subnet behind public load balancer

1Backbone of everything is Oracle database for APEX applications. I have an Autonomous database instance with Transaction processing workload type with autoscaling enabled. It is deployed with a Private Endpoint in a private subnet. You can check official documentation for creating one. For accessing your ATP instance you can see Part 1: Accessing Autonomous Database over Private Endpoint using SQL Developer

2Although ATP comes with Oracle managed ORDS, I want to install my own ORDS server on compute vm. In Part 2: Installing Customer Managed ORDS on Compute Instance for Autonomous Database I install and configure java and ORDS, also do the required networking configuration.

3For improving security posture, both database endpoint and ORDS instance is placed in a private subnet. For exposing APEX application I follow the steps in Part 3: Serving APEX in Private Subnet behind Public Load Balancer . This part is all about load balancer configuration, backend health check, SSL termination and troubleshooting connection issues. It can be helpful for any kind of load balancer / application configuration and problem solving.

4In a real life deployment, I need to find a way to access admin resources yet be able to protect them from public internet access. For this purpose, I am securing some URLs with load balancer redirect rules as load balancer sits in between as a reverse proxy. I can still access those admin resources through private subnet using Fastconnect, VPN or bastion service. These topics covered in Part 4: Securing APEX Admin Resources with Load Balancer

5Autonomous database will scale up to 3x according to CPU requirements, that is easy configuration. For the middleware part, I use metrics based auto scaling for adding ORDS instances when existing instances in the pool have 80% or more CPU utilization. I cover scaling configuration along with testing in Part 5: Autoscaling ORDS servers in private subnet behind public load balancer

I also recommend checking my colleague John Lathouwers's GitHub , he has some nice scripts.

Monday, May 15, 2023

How can I mount Object Storage as NFS target on Windows with rclone?

This is one of the most common requirements: How can I mount Oracle Object Storage as an NFS target on my Windows environment? Normally this is done with Storage Gateway on Linux environments, but unfortunately Windows operating system is not supported yet. Next best thing is to use rclone . So here is how to do it.

1First I start with prerequisities, install oci cli as described on the link and get it working

2I also needed to install WinFsp .

3Download rclone , unzip and put on your PATH.

4Configure rclone as described here

5Usage is simple. All commands are listed here . Assuming that your remote is named as remote:

Thursday, May 11, 2023

Part 5: Autoscaling ORDS servers in private subnet behind public load balancer

I want to autoscale my ORDS servers based on CPU metric, so whenever the servers are busy and CPU utilized over 80% then a new node will be added to the instance pool and the backendset. You will need a loadbalancer configuration which I explained in this blog post. I have compute nodes that are running ORDS in standalone mode, you can find installation and configuration steps here .

On the compute node, I've installed java and ords and also configured to access database. Now I want to use this installation as a template for creating other nodes when I want to autoscale. Unfortunately if I use the instance as a source to my instance configuration, it will not include anything from the boot volume, but just the base image that the instance is launched from. More detail is here .

1So for that reason I will start by creating a custom image

I can use this oci cli command for the same purpose


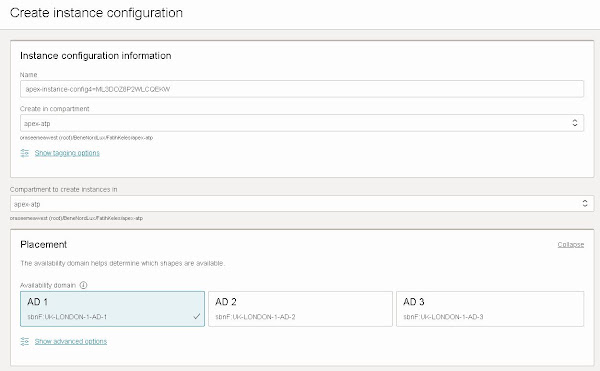
2Then I create an instance configuration with the placement (compartment and AD) information

using my custom image which I've created in the first step

placing instance in my private subnet where all my ORDS nodes will be and attaching the network security group which will allow load balancer communication

I am adding my ssh key just in case I might need to access the servers

I also make sure that Bastion agent is enabled, plus put some piece of cloud-init script you don't see it here but it will not make a difference

I can also do the same thing with oci cli, you can find ords-instance-details file on my github


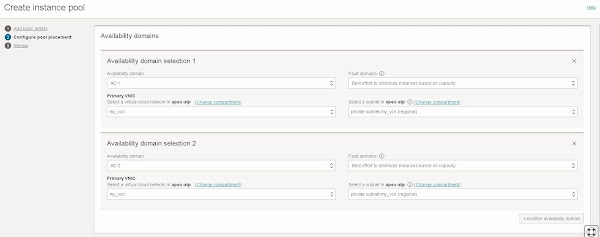
3Now I am going to create an instance pool which will create instances using the instance configuration I've just created.

Instance pool is distrubuting instances to availability domains for risk mitigation. Note that my subnets are regional, and instance will be in private subnet

And the launched instances will be placed in load balancer backend set. I am providing port information for health check.

Here is the oci cli command that can be used for creating the same instance pool in above screenshots. You can find ords-placement-configurations.json file on my github.


4I want my instance pool to scale-out and scale-in according to CPU utilization. For that purpose I am creating an autoscaling configuration for my recently created instance pool

Instance pool will scale-out according to CPU utilization metric, if the CPU usage is above threshold it will add one instance to the pool

I want the pool shrink with a scale-in threshold that will remove one instance. I want the pool have at least 3 instance at all times and don't want the pool grow beyond 6 instances.

Here is the oci cli command to create the autoscaling configuration, you can download ords-autoscaling-policies.json file from my github.


5For testing purposes I will use the following script. Script finds all the instances in the pool, and creates some CPU load which will trigger auto scaling policy to scale out. I've made some configuration to issue commands remotely which is explained here . Base custom image has some packages already installed for stress testing, you can read about it here

Featured

Putting it altogether: How to deploy scalable and secure APEX on OCI

Oracle APEX is very popular, and it is one of the most common usecases that I see with my customers. Oracle Architecture Center offers a re...