Showing posts with label atp. Show all posts

Saturday, May 3, 2025

Sending Email with APEX_MAIL and Mailx using OCI Email Delivery

This is a very common requirement, funny that I've never used it until today. So the requirement is to send emails from my APEX application using APEX_MAIL package. For cloud deployments (especially on Autonomus Database) recommended way is to use Email Delivery service. And of course most customers would like use their own domain as the sender. So here are the steps:

1 Create email domain following Developer Services >> Email Delivery >> Email Domains >> Create Email Domain

2 Add DomainKeys Identified Mail (DKIM)

Create DKIM selector in the <prefix>-<shortregioncode>-<yyyymm> format. You can find short region codes here .
Click Generate DKIM Record button, it will populate CNAME values, save these values to update your DNS records.
Until your DNS records updated, you will see it inactive.

3 Update your DNS records, add new CNAME. I am using Cloudflare but it can be OCI DNS Management as well.

Once the DNS records updated, it will become active. You can check the status using refresh button.

4 Create Approved Sender.

5 Update DNS records with Sender Policy Framework (SPF).

You can also check the SPF configuration document . It will look like this: v=spf1 include:rp.oracleemaildelivery.com include:ap.rp.oracleemaildelivery.com include:eu.rp.oracleemaildelivery.com ~all
Add a TXT record.

6 Create SMTP credentials following User >> Profile >> Saved Passwords >> SMTP credentials >> Generate Credentials. Save the values as password won't be displayed again.

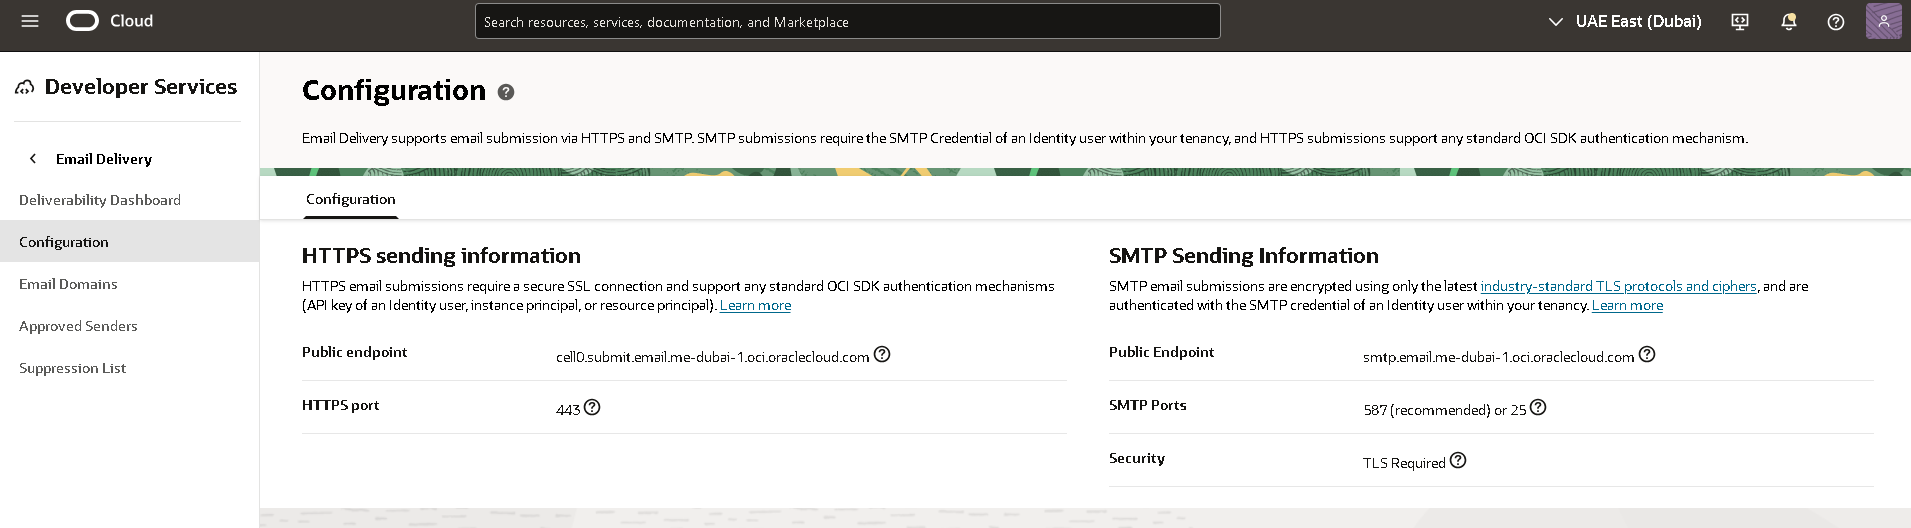
7 Get SMTP Sending Information by following Developer Sevrvices >> Email Delivery >> Configuration menu path. Copy public endpoint and port information.
8 Test sending email.

Option 1: Use APEX_MAIL

i Connect to your Autonomous Transaction Processing as ADMIN user using SQL client and configure the following SMTP parameters using APEX_INSTANCE_ADMIN.SET_PARAMETER.

ii Send a test email using APEX SQL Workshop >> SQL Commands specifying the approved sender.

There was a delay of minutes but I receieved the email.


Option 2: Use Mailx on OEL 8

i Install and configure mailx.
Then email was sent almost instantly.


References:
1.Email Delivery Service Documentation
2.Comprehensive Guide to Testing OCI Email Delivery Monir's guide was excellent, basicaly I followed the steps in hios post
3.Integrating Oracle APEX with Email Delivery Emil Delivery service has a good documentation for integrating the service with different applications
4.APEX_MAIL Package specification
5.OCI Regions and Region Keys

Friday, September 22, 2023

Run Autonomous Database, ORDS and APEX on your laptop with single command!

Last week was full of excitement, you know it is that time of the year: Cloud World You can watch the recaps! Lots of announcements, new partnerships, product launches, demos, tons of interesting sessions and chance to connect with gurus, product managers and community! I didn't have the chance to be there yet, maybe next year...

One of the announcements was a container image for Autonomous database made available! It has built-in tools like Database Actions (SQL Developer Web, Performance Hub, etc.), ORDS and APEX, and Mongo API is enabled. Just the right things for developing locally without loosing anytime. Here is the offical documentation and the GitHub Page where you can find all the details.

So here is what I did to have my container running on my Windows laptop within WSL2 Ubuntu.

1We start with podman installation (you can also use docker)

2When the container runs the following ports will be exposed:

Port Description
1521 TLS
1522 mTLS
8443 HTTPS port for ORDS / APEX and Database Actions
27017 Mongo API ( MY_ATP )
I recommend pulling the image first. Size is around 10GB and it can take a while. You can run the container with the following command.

3 Now we need to change ADMIN user password. There is a script provided for this purpose and we need to execute it by connecting to container.

4 We are ready to explore the tools already provided. Point your browser to https://localhost:8443/ords/my_atp/ and a landing page will welcome us.

5 APEX and Database Actions are also made available, no installation, no configuration, start building immediately.

6 How about connecting to database? Easy, for mTLS it requires a wallet. You can copy the wallet to any location on your local filesystem, export TNS_ADMIN then connect.


Note: You can safely skip this first part, unless you want to update your WSL2 Ubuntu. I was using a manual built experimental kernel because of a really weird debugging requirement I had in the past and I didn't need it anymore. So I needed to replace it but never had the chance or motivation, but this time it was inevitable. So writing this section as a reference for my future self.


References:
1. ADB Free GitHub Page: https://github.com/oracle/adb-free
2. Podman Documentation: https://podman.io/docs/installation
3. Instal Docker on WSL2: https://nickjanetakis.com/blog/install-docker-in-wsl-2-without-do...
4. Autostart Docker Daemon: https://blog.nillsf.com/index.php/2020/06/29/how-to-autom...
5. Upgrade Ubuntu: https://askubuntu.com/questions/1428423/upgrade-ubuntu-in-wsl...
6. Reboot Ubuntu: https://superuser.com/questions/1126721/rebooting-ubuntu-o...

Tuesday, September 5, 2023

How to discover tenancy details and self OCID with Autonomous database

Know thyself inscribed on Temple of Apollo, it is the door to true wisdom. While scripting or coding for automating a process, I often need the database to be self aware and discover information like tenancy, OCID and region etc. So here is how you can obtain details on Autonomous database

cloud_identity column contains a json formatted text containing OCIDs for tenancy, autonomous database, compartment etc. And if you are scripting/coding you will need to extract those json attributes, you can use JSON_TABLE function. This will give you nice and clean values that you can directly use.

Tuesday, June 13, 2023

How to connect Autonomous Database using java JDBC with or without a wallet

Sometimes it is good to go back to the basics. Connection between Autonomous database and the client is always encrypted with TLS. Depending on the network access type, either it has to be mutual (mTLS) or TLS only. Why this is important? Well, I can think of couple good reasons. If I allow "secure access from everywhere" to my database then I would want to ensure only the clients that I shared necessary information (in this case a wallet) should be able to access it. Other logical options are allowing access only from the network addresses that I know, like my own IP address or from private network that I trust.

So I will be writing a small piece of java code to test it. It is all about setting my environment and constructing JDBC connection string. So at the minimum I add jdbc driver to my pom file. You might want to use UCP for your applications, it will be the same. I will be following official documentation

1 In order to connect with a Wallet, I download the wallet from console, unzip it then use the folder as my TNS_ADMIN. Connection string looks like

jdbc:oracle:thin:@{CONNECT_DENTIFIER}?{TNS_ADMIN}
As you will see there are different ways to construct it: Wallet folder can be set as a system property or passed as a query string. Here is a small sample code

2 If I can restrict access to my autonomous database with an access controll list (ACL) or connect with a private endpoint in a private subnet then I can uncheck Require mutual TLS (mTLS) authentication checkbox then I can connect to this database without a wallet. Connection is still encrypted with TLS.

Thursday, May 18, 2023

Different Ways to Access Cloud Resources from Autonomous Database

When working with DBMS_CLOUD package or cloud REST APIs , I need database instance to be authenticated and authorized. Mainly there are two ways of doing this.

1I can use my own credentials or any IAM users credentials. For this purpose I need to use DBMS_CLOUD.create_credential procedure that comes in three different signatures.

aI can create an Auth token from console or using cli

then using this token and my user I can create a credential. Just to avoid confusion with below script, I use my email address as username in my tenancy.

bAnother way is to introduce my API signing RSA keys to OCI, then use it to create a credential. For generating my own key pair I can use openssl as described here in official documentation . I can also use the console which can generate the keys for me and I can download it. Using console I can upload my existing keys too.

After the API key added to OCI, console will display a configuration that can be used with SDK, CLI or REST calls.

CLI doesn't offer a command for adding API keys but I can always use REST API with http raw request, again response will display required information to use API key with SDK and CLI

Note:Use \n as new line feed for formatting your encoded public/private key

Now I can use a different version of create_credential procedure

Note:Both credentials (Auth Token and API Key) are directly linked to my OCI IAM user.

2I can also use Resource Principals to authorize my ATP instance. Previous method is tied to an IAM user (notice both Auth Token and API Key are created under user), resource principal uses Dynamic Groups to identify the instance and IAM no user is required.

aFirst I need a Dynamic Group to identify my instances. I generally use tagging, but sometimes allowing all autonomous instances is also fine.

bThen with a policy I grant priviliges to the members of that dynamic group

Note:The resource principal token is cached for two hours. Therefore, if you change the policy or the dynamic group, you have to wait for two hours to see the effect of your changes. This note is from documentation .

Here is the complete list of cli commands with some outputs for the same purpose:

cAnd I connect to the database and enable Resource Principal to Access Oracle Cloud Infrastructure Resources .

Testing

1I can see that my credential is visible and enabled in all_credentials. For testing I am just listing objects under an object storage bucket

2I can list objects under a bucket using any of the credentials.

Here is some SQL for testing

Wednesday, May 17, 2023

Putting it altogether: How to deploy scalable and secure APEX on OCI

Oracle APEX is very popular, and it is one of the most common usecases that I see with my customers. Oracle Architecture Center offers a reference architecture for this purpose: Deploy a secure production-ready Oracle Autonomous Database and Oracle APEX application . If you are comfortable with terraform or willing to learn it, I would definitely recommend using it. Even if it doesn't fit your requirements entirely it is a good starting point.

Having said that, I wanted to crack it open and see what's in it (I know typical boy's fun...), and in the end I come up with a series of blog posts while building the reference architecture piece by piece. Good for understanding what is under the hood and excellent for showing the value of terraform after doing all the work manually.

So here I start with the final architecture. I will explain the components and provide the links while doing so to help you build your own.

Quick links to the posts in the series

Part 1: Accessing Autonomous Database over Private Endpoint using SQL Developer
Part 2: Installing Customer Managed ORDS on Compute Instance for Autonomous Database
Part 3: Serving APEX in Private Subnet behind Public Load Balancer
Part 4: Securing APEX Admin Resources with Load Balancer
Part 5: Autoscaling ORDS servers in private subnet behind public load balancer

1Backbone of everything is Oracle database for APEX applications. I have an Autonomous database instance with Transaction processing workload type with autoscaling enabled. It is deployed with a Private Endpoint in a private subnet. You can check official documentation for creating one. For accessing your ATP instance you can see Part 1: Accessing Autonomous Database over Private Endpoint using SQL Developer

2Although ATP comes with Oracle managed ORDS, I want to install my own ORDS server on compute vm. In Part 2: Installing Customer Managed ORDS on Compute Instance for Autonomous Database I install and configure java and ORDS, also do the required networking configuration.

3For improving security posture, both database endpoint and ORDS instance is placed in a private subnet. For exposing APEX application I follow the steps in Part 3: Serving APEX in Private Subnet behind Public Load Balancer . This part is all about load balancer configuration, backend health check, SSL termination and troubleshooting connection issues. It can be helpful for any kind of load balancer / application configuration and problem solving.

4In a real life deployment, I need to find a way to access admin resources yet be able to protect them from public internet access. For this purpose, I am securing some URLs with load balancer redirect rules as load balancer sits in between as a reverse proxy. I can still access those admin resources through private subnet using Fastconnect, VPN or bastion service. These topics covered in Part 4: Securing APEX Admin Resources with Load Balancer

5Autonomous database will scale up to 3x according to CPU requirements, that is easy configuration. For the middleware part, I use metrics based auto scaling for adding ORDS instances when existing instances in the pool have 80% or more CPU utilization. I cover scaling configuration along with testing in Part 5: Autoscaling ORDS servers in private subnet behind public load balancer

I also recommend checking my colleague John Lathouwers's GitHub , he has some nice scripts.

Wednesday, April 19, 2023

Part 4: Securing APEX Admin Resources with Load Balancer

So in Part 2 I've installed an ORDS instance in a private subnet. Then in Part 3 I've configured a public load balancer to serve APEX to public internet. Now I want to protect admin resources to make sure they are not exposed. For that purpose I will use Load Balancer URL redirect rules .

1Currently I can login through load balancer public IP and see database actions

2But I don't want to expose database actions and other administrator resources to public internet. So I have added following URL redirect rules to my load balancer.

3And they are working, now I can't login to database actions through load balancer, immediately redirected to apex.oracle.com as rule dictates.

4If I bypass loadbalancer and access ords instances through private network than database actions and admin resources are accessible

5I only want to serve HTTPS traffic to public internet so I create another rule set for redirecting HTTP to HTTPS

6In order to strengthen security for production deployments user names should be chosen different, ADMIN and Workspace logins should be disabled. As well as ADMIN user should be locked.

Thursday, April 13, 2023

Part 2: Installing Customer Managed ORDS on Compute Instance for Autonomous Database

For running your own ORDS instance, follow steps here

1 Create a Network Security Group for your instance, allow ingress traffic to 8080 and 8443 ports from private subnet. Also allow egress traffic. We will test the installation using bastion service.

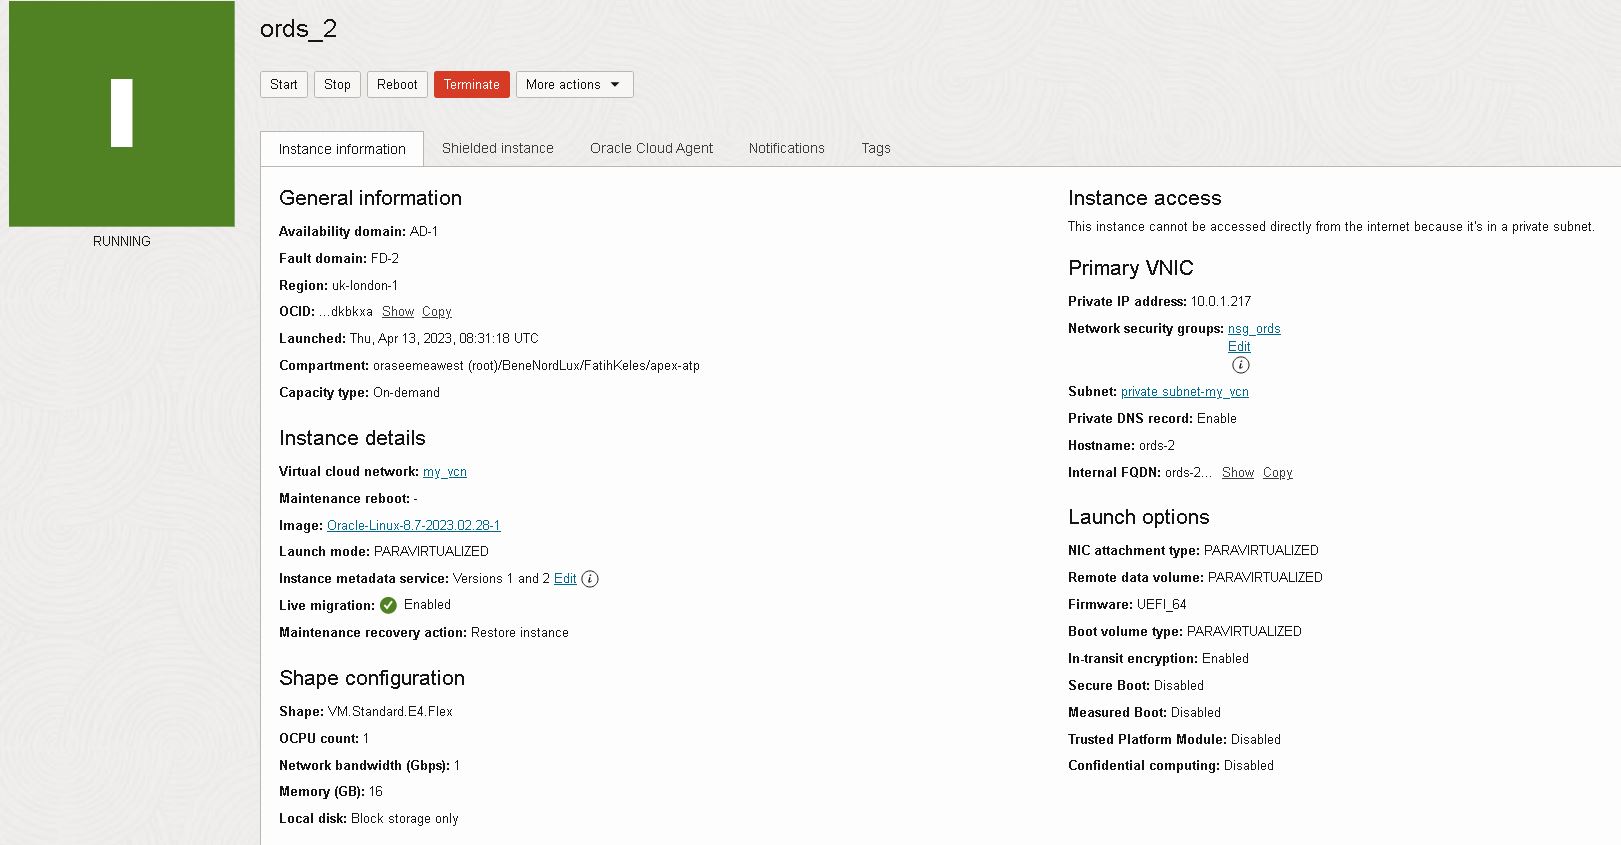
2 Launch an instance in your private subnet. I preferred Oracle Linux 8 with VM.Standard.E4.Flex shape. Also enable Bastion service under Advances options > Oracle Cloud Agent

3 Attach NSG created in step 1.

4 Create a bastion service in the same private subnet and then create a managed SSH session to connect to instance.

5 Connect to instance and do following yum updates and installations with root user.

6 Create following folders and upload your Autonomous Database Wallet to config folder

Note: You can use use scp in combination with bastion session to copy your local file

7Install using ords interactive command line, refer to documentation for options

Note: I've enabled all features, you can choose None for production deployments

Note: I've preffered to serve ORDS over port 8080 using HTTP, as I plan to put a loadbalancer infront of the VM and serve HTTPS thus offloading SSL

8If you see the following CORS error message:

Login to ORDS instance, then edit /etc/ords/config/global/settings.xml to add the following entry:

9Open ports 8080 and 8443 on local firewall

10Enable ORDS service, surviving restarts

11Create a bastion port forwarding session

12Start local port forwarding session

13Test pointing your browser to localhost:8080

Thursday, April 6, 2023

Flashback Transaction Query on ATP Shared

By default flashback transaction query is enabled on ATP-S. Let's see how it works.

Unfortunately most important columns ROWID and UNDO_SQL are NULL. In order to let Oracle populate these columns we need to enable supplemental logging .

Now we are able to see ROWID and UNDO_SQL.

Featured

Putting it altogether: How to deploy scalable and secure APEX on OCI

Oracle APEX is very popular, and it is one of the most common usecases that I see with my customers. Oracle Architecture Center offers a re...